Read, search and annotate your documents
The built-in PDF viewer allows multiple open documents, highlighting, post-it-like note taking and more.
view all guidesA reference with an attached PDF will display a small PDF icon next to its listing in Mendeley Desktop. Either click on the PDF icon, or double click on the reference listing, to open Mendeley's PDF Reader.

-
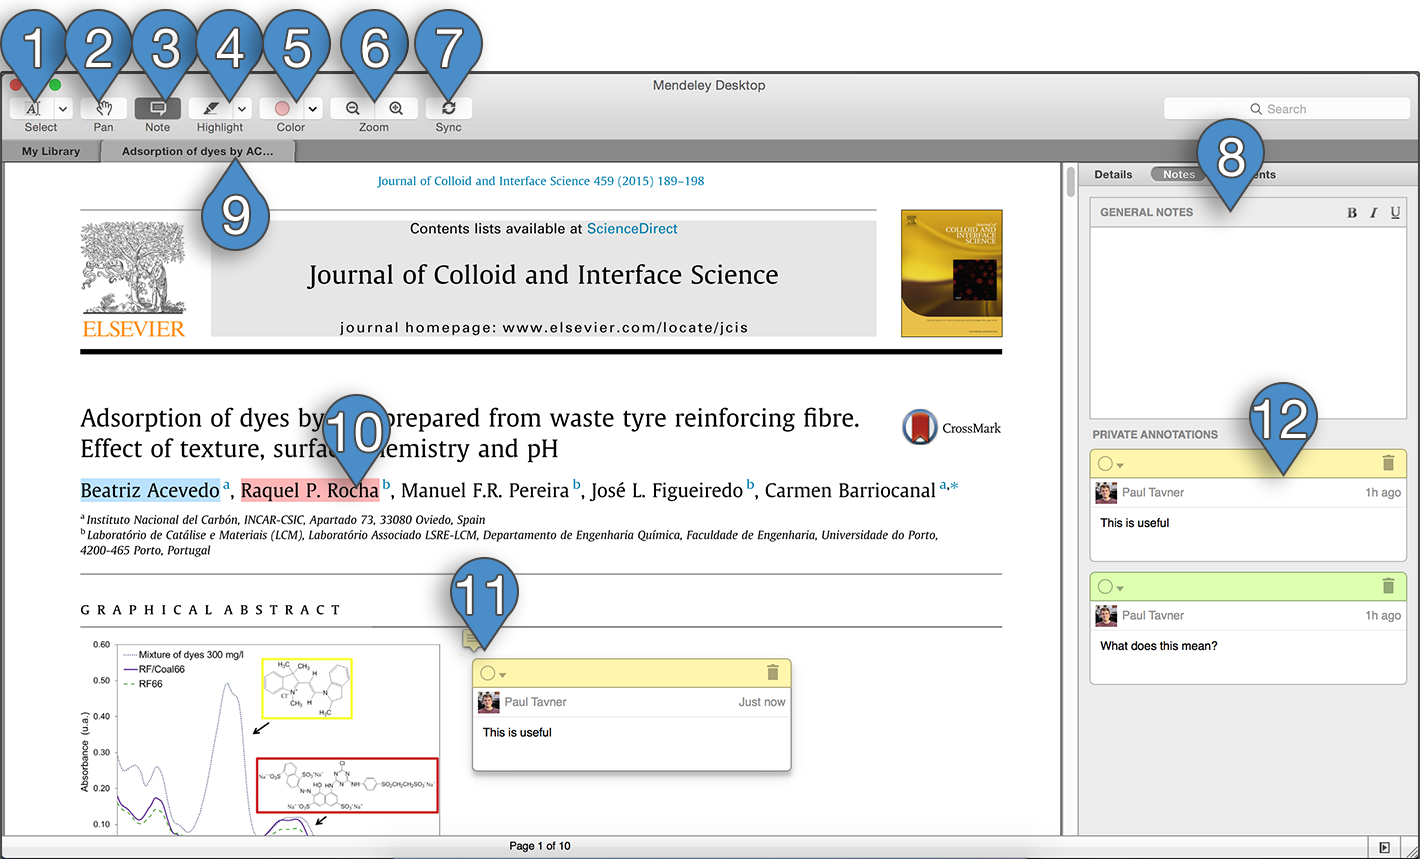
Text select tool – use this tool to select text within your document. You can use this to copy and paste relevant passages, or to apply highlighting (see below).
-
Pan tool – use this tool to navigate around the document. Click and drag to scroll through the document.
-
Note tool – use this tool to create notes at specific locations within the document – sometimes called ‘sticky notes’. Click wherever you want the note to appear. See number 11 for an example of a note within a document.
The note tool will appear in whichever color is currently set as active (see below).
-
Highlight tool – use this tool to apply highlighting to text within the document. The highlight tool will apply whichever color is currently set as active (see below).
Use the dropdown menu that appears next to the tool to switch between text-based highlighting and rectangle-based highlighting. The latter can be useful for images, graphs, charts, or large sections of text.
See 10 for an example of highlighted text.
-
Color selection – Mendeley supports highlighting in a number of different colors. Use this menu to select the currently active color. Notes and highlighting that you apply will use this color.
Note that you can change the color of an existing note by using the dropdown menu that appears in the top left corner of the note when open (see 11) or from the Notes tab of the details panel (see 12). You can change the color of an existing highlight by right clicking on it.
-
Zoom – use these buttons to zoom into and out of the PDF.
-
Sync - use this button to force Mendeley to perform a sync. This will push any changes you’ve made to your library up to the cloud for storage, making them available on other devices and computers.
You should sync frequently in order to ensure that your most recent changes are saved to the cloud.
See 07. How sync works for more details.
-
General notes – use this field to make notes on the current document. These are not located to a specific position, unlike ‘sticky’ notes.
You can use rich-text formatting to apply bold, italics and underlining for emphasis.
Note that the contents of ‘General notes’ will also be returned in search results.
-
Tabs – each document you open for reading will receive its own tab. You can switch back and forth between documents by clicking on each.
Return to the browsing view by closing the document tabs, or by clicking on the ‘My Library’ tab that appears.
-
Highlighted text – highlighted text within your document will look like this. Note the multiple colors. Right click on a passage of highlighted text to modify or remove the highlighting.
Note that it is possible for highlighted sections to overlap if necessary.
-
Note – Notes within the document will be represented by small icons. Click the icon to reveal the contents of the note.
With the note open, you can make changes to the text it contains, modify its color using the drop down menu that appears in the top left corner, or delete it entirely using the trash can icon.
-
Note list – this section of the Notes tab lists all of the sticky notes created throughout the document. Clicking on a note in this list will take you to the note’s location within the document.
You can also make changes to notes from this list.

